Hide Outer Wrapper, Footer Wrapper, Sidebar Wrapper, Comments-tabs in Blogger Pages

Hide Outer Wrapper, Footer Wrapper, Sidebar Wrapper, Comments-tabs in Blogger Pages

Remove Outer Wrapper, Footer Wrapper, Sidebar Wrapper, Comments-tabs in Blogger Pages
This is one of the biggest problem for new Bloggers that Hide Outer Wrapper, Footer Wrapper, Sidebar Wrapper in Blogger Pages static pages, and make the some or all Blogger pages show in full width. Today, i am going to give a unique and easy solution for each Blogger who want to done his/her job done. Many Bloggers use the different blog with different template that has different settings. Today, I finally took the time to generalize this tutorial. Anyone can use the solution in this page, and you'll get what you want - refer to the title, I'm not gonna repeat what this tutorial does. Or maybe I will. You get to hide your sidebars (doesn't matter left, right or both) and use that space to widen your main posting area, on pages that you choose. You can apply this trick both on your static pages and/or your post pages.


Hide/Remove Outer Wrapper, Footer Wrapper, Sidebar Wrapper, Comments-tabs in Blogger Pages

Below are the Steps that you have to follow the carefully. Carelessness may lead to no-effect.


Method 1. To apply this onto The all Pages.
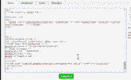
Go to Blogger Dashboard > Template > Edit HTML and press C + F and search for </b:if>
Copy the below code and paste it right after the </b:if> tag.


<b:if cond='data:blog.pageType == &quot;static_page&quot;'>
 <style type='text/css'>
.post img{background:#fafafa;height:auto;max-width:95%;border:0;margin-bottom:1.5px;transition:all 0.6s ease-out;}
.post img:hover {opacity:0.95;}#sidebar-wrapper, .comments-tabs {visibility:hidden;opacity:0;width:0;height:0;}
.post {background: white;text-align:center;margin-bottom:20px;position:fixed;width:100%;height:100%;}
.post {top:30%;position:relative;font-size:20px;color:#eee;}
 </style>
</b:if>


Method 2. To Apply this onto The selected Pages.
Go to Blogger Dashboard  > Select your Published page and press Edit and then Switch to HTML (See the screenshot below).
Hide Outer Wrapper, Footer Wrapper, Sidebar Wrapper, Comments-tabs in Blogger Pages


Copy the below code and paste it at the top of your HTML page. (See the screenshot below).


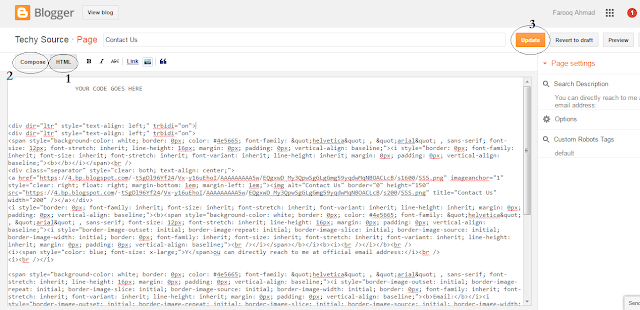
Now click Compose Button and then Update. (See the screenshot below).
If this tutorial worked for you, please don't forget to post your valuable comments.


<b:if cond='data:blog.pageType == &quot;static_page&quot;'>
<style type='text/css'>
.post img{background:#fafafa;height:auto;max-width:95%;border:0;margin-bottom:1.5px;transition:all 0.6s ease-out;}
.post img:hover {opacity:0.95;} #sidebar-wrapper, .comments-tabs {visibility:hidden;opacity:0;width:0;height:0;}
.post {background: white;text-align:center;margin-bottom:20px;position:fixed;width:100%;height:100%;}
.post {top:30%;position:relative;font-size:20px;color:#eee;}
</style>
</b:if>

In the above code, i removed the only #sidebar-wrapper and .Comments-tabs. If you want to hide the outer-wreapper and footer wrapper too, please insert the #Outer Wrapper, #Footer Wrapper, #Sidebar Wrapper etc. just before the highlighted code in line number 5.

Attention: Some template designer use the # (hash) tag instead of . (dot). If the above code doesn't worked, you can replace the . (dot) with # (hash).

If you need help send me a Quick Message
Send Spoofed Emails Anonymously

Send Spoofed Emails Anonymously

How to Send Spoofed Emails Anonymously
Most of us are very curious to know a method to send spoofed emails to our friends and family for fun. But the question is, is it possible to send spoofed emails in spite of the advanced spam filtering technology adopted by email service provides like Gmail, Yahoo etc? The answer is YES, it is still possible to bypass their spam filters and send spoofed emails anonymously to your friends or family members. For example, you can send an email to your friend with the following sender details.
From: Bill Gates 
The art of sending this kind of email is known as Email Spoofing. One of the easy way to send a spoofed email is by using our own local SMTP server. In the past, I have tried SMTP servers like QK SMTP server. This method used to work successfully in those days, but as of now, it has a very low success rate since Gmail and Yahoo (all major email service providers) blocks the emails that are sent directly from a home computer.


How to Send Spoofed Emails

In this post, I have come up with a new method of sending spoofed emails to anyone without having to worry about being blocked or filtered as Spam. In order to accomplish this, all you’ve to do is use a “relay server” while sending the spoofed emails.


What is a Relay Server

In simple words, a relay server is an SMTP Server that is trusted by major companies as an authorized sender of the email. So, when you send an email using a relay server, the email service providers like Yahoo and Gmail blindly accept the emails and deliver it to the inbox of the recipient. If the SMTP server is not authorized, Google and Yahoo will reject all the emails sent from this SMTP server. This is the reason for which using our own SMTP server to send emails fail.

How to Find a Relay Server

Now, all we have to do is find a trusted SMTP server so as to send spoofed emails successfully. Usually, all the emails that are sent from web hosting providers are trusted and authorized. So, you have to find a free web hosting provider that allows you to send emails. But, most of the free web hosts disable the Mail feature and do not allow the users to send emails. This is done just to avoid spamming. However, all the paid hosting plans allow you to send any number of emails. Once you find a hosting service that allows to send emails from their servers, it’s just a cake walk to send anonymous emails. All we have to do is just modify the email header to insert a fake From: address field into it. there is a PHP script that allows you to send emails from any name and email address of your choice. Here is a step-by-step procedure to setup your own anonymous email sender script:


1.Go to X10 Hosting and register a new account.
2. Download the script from the below:

  • DOWNLOAD

3. Login to your Free Web Hosting Area Account and click on File Manager.
4.Upload the sendmail.php, pngimg.php and bg1.PNG files to the server.
5.Set permissions for sendmail.php, pngimg.php and bg1.PNG to 777
6.Now type the following URL:

http://yoursite.x10hosting.com/sendmail.php
7.Use the script to send spoofed emails anonymously to your friends and have fun.
Knigulper Forum (Blogger Support)

Knigulper Forum (Blogger Support)

blogger forum support

The moto of Knigulper blogger forum is to resolve the blogger issues like blogger Templates/Themes, CSS,  JavaScript, JQuery, Widgets, Plugins, HTML and SEO . I hope this forum may bring the useful results for those who are new on the blogger track.
You can ask here any questions related to Blogger.


Basic Instructions:

Simply Click the NEW TOPIC at the top of the Group and Select atleast one tag at the bottom of the group while posting/asking.     


Here is an example: 
suggested tags: Blog-Designing ·  Blogger-Template ·  Coding ·  Computer-Programming ·  Computer-tricks · 
 Cyber-Protection ·  eBooks ·  Online-Tools ·  SEO · Software-Download ·  Themes ·  Web-Designing
At least one tag is required when posting to this group


Kindly follow these rules before posting
  • Search before posting
  • Explain your problem in brief
  • Respect other members and be helpful
  • Don't use this forum for spamming and promoting purpose


Visit Forum


General Posting Guidelines


We figured this was necessary because a lot of people come in and post threads without thinking, and without realizing that there is no possible way they could get help because of the way they posted the question. Here are some general guidelines.

1. Please use SEARCH first!search_box


There is a pretty good chance that unless you have some really odd or unique problem that it has been addressed on our forum before, please use the forum’s search feature first to see if there are already some good threads on the subject. It’s easy to search – just click the “Search” button at the top right of the page.


2. Be DESCRIPTIVE and Don’t use stupid topic names


Post a descriptive topic name! Give a short summary of your problem IN THE SUBJECT. (Don’t use attention getting subjects. They don’t get attention and only annoy people).

Here’s a great list of topic subjects YOU SHOULD NOT POST :
Help me,  Hello,  Very urgent, I have a question

Generally ANYTHING similar to those is unacceptable. Just post your problem.

Here is a good example of a way to post a question

"How to add Aothor bio box in blogger template", “How to calculate the density”, "How to remove the credit links in blogger template" or
“Where is the GOOGLE exam centre in UAS” etc. etc.

Remember when people help you, they are doing YOU a favor

Be patient, help people out by posting good descriptions of what you need help with, and not snapping at people with garbage such as
If you aren’t going to help don’t waste my time replying”.

Forum Rules


1. No Spam / Advertising / Self-promote in the forums


These forums define spam as unsolicited advertisement for goods, services and/or other web sites, or posts with little, or completely unrelated content. Do not spam the forums with links to your site or product, or try to self-promote your website, business or forums etc.
Spamming also includes sending private messages to a large number of different users.


DO NOT ASK for email addresses or phone numbers


Your account will be banned permanently and your posts will be deleted.

2. Do not post copyright-infringing material

Providing or asking for information on how to illegally obtain copyrighted materials is forbidden.

3. Do not post “offensive” posts, links or images

Any material which constitutes defamation, harassment, or abuse is strictly prohibited. Material that is sexually or otherwise obscene, racist, or otherwise overly discriminatory is not permitted on these forums. This includes user pictures. Use common sense while posting. This is a web site for accountancy professionals.

6. Be respectful of other members at all times

All posts should be professional and courteous. You have every right to disagree with your fellow community members and explain your perspective.

However, you are not free to attack, degrade, insult, or otherwise belittle them or the quality of this community. It does not matter what title or power you hold in these forums, you are expected to obey this rule.


General Forum Question/Answers
Q. What You Can Ask?
A. You can ask anything related to Blogger like Templates/Themes, CSS, 

JavaScript, JQuery, Widgets, Plugins, HTML and SEO

Q. Who Can Ask?
A. Anyone with Google account can post/ask a topic on group.

Q. Who Can Reply?
A. Anyone having the knowledge about blogger.


What happens if I break a rule?

If you break a rule, then you will either be warned or banned. A ban of your user account may either be temporary or permanent.
The administrators and moderators also have the right to edit, delete, move or close any thread or post as they see necessary, without prior warning.

What happens if I see a thread/post which has broken a rule?

Please report the thread/post to the moderators or admin.

Where can I find out who is in charge?

The Forum Moderators are displayed in every Forum.

Becoming a moderator

All moderator applicants must be a member for at least 90 days (3 months) and have at least 100 posts.
You must be active in the individual forums you wish to moderate and regularly create and respond to threads in those forums.
You must also maintain a working knowledge of the subject matter.

Please be aware that applying to be a moderator does not guarantee acceptance and that moderators will only be appointed when needed.

Current moderators and administrators will review applications and decide if the applicant fits the desired post. Administrators have the final say and we reserve to right to refuse applicants with or without cause.

Moderator Policy

In Order To Apply To Be A Moderator You Must be:


  1. A forum regular
  2. Have been at the forum for over 3 months
  3. Have a positive presence on OpenTuition Forums
  4. Be proactive
  5. Knowledgeable in the Forums they would like to moderate.
  6. Polite and helpful towards other members and give advice whenever needed and whenever possible.
  7. Visit the forum each day, actively take part in discussions as often as possible, ideally once a day, setting a good example to the other members.
  8. Take an active part in discussions between Moderators relating to the running of the forum.
  9. Help to keep unsuitable content out of the forums as much as possible.

I hope you respected visitors/members/moderators will follow all the above mention instructions carefully and delightfully. 

How to remove Quick-Edit icon, Screwdrive or Pencil icon in Blogger template

How to remove Quick-Edit icon, Screwdrive or Pencil icon in Blogger template

Remove Quick-Edit icon or Pencil icon in Blogger template
Quick-Edit or Pencil icon shows at the top of your blog post to access the admin panel to edit you published blogger posts quickly.

Introduction to Quick-Edit icon?

You may have noticed the pencil or gear like icon(s) in your blogger site. Well they are called the Quick-Edit icons for blogger posts or page post to easily editing tool. Simply it’s the BlogSpot Shortcut edit. But the headache is that they even appear publicly, that can eat up your blogger's template style beauty. 

Should i Remove this Icon?

It depends on the Icon privacy. Try to logout from you blogger and visit you blogger to verify whether the Icon shows publicly or not. If the icon is showing publicly, i recommend to remove the icon. But the icon show only when you are logged  in, then don't remove it as it plays an essention role to access the post editing element easily.
Basically removing the Quick-edit icon is as easy as A,B,C. 


There are two methods to remove this Icon:

Method 1st. 
  1. Login to your blogger dashboard 
  2. Template 
  3. Edit HTML 
And finally Press C + F and Search for ]]><b:skin> and put the following piece of CSS code right before the ]]><b:skin>

.quickedit{display:none;visibility:hidden;}

Now Save your template and you are done.


Method 2nd. 
  1. Login to your blogger dashboard 
  2. Layout
  3. Blog Post (See the screenshot below)
Blog post editing
  1. Click Edit as shown in the above screenshot towards the Arrow.
  2. Uncheck (Deselect) Pencil Icon (As shown in the below Screenshot)
Blog post edit

Just point your mouse as shown in the above image through the Arrow and finally scroll down and Hit Save.

Online Word Calculator | Character Count/Calculator

Online Word Calculator | Character Count/Calculator

Online Word Calculator | Character Count

Finally, an easy way to count the number of words that are entered into a form!
The following tool is used to count your characters words, and new lines. You can use it on article writing for checking your text lengths and more purpose.

How to Use Online Word Calculator?

Enter the words/characters inside the blank box and hit Count Word and this tool will show you the total numbers of count words including characters and spaces.

Knigulper
Online Code Compressor

Online Code Compressor


Online Code Compressor

Code Compressor

The following tool is very useful to you, you can compress your programming code and reduce the size so your execution time will increase.

CSS HTML Code compressor


The above tool is used to compress the following code

HTML code compressor

CSS code compressor

JavaScript code compressor

PHP code compressor

ASP code compressor

Blogger code compressor

Smarty code compressor

Animated Social Share Button For Blogger with CSS Design

Animated Social Share Button For Blogger with CSS Design

Animated Social Share Button For Blogger with CSS Design
Animated Social Share Button For Blogger with CSS is a share button that is make your blog more attractive. If you search for share button on internet, then you found many results like Adthis Share This, Simple Share button Addtoany etc share button for blogger. Those are mostly helpful and workable.
Today i am share an awesome animated mouse hover social share button for blogger. This share button is fully customized with CSS. Using this share button you should add Facebook, Twitter Google+ Linkedin and Pinterest share button on blogger blog.

Why Social Share Button?

Social share buttons let's your readers to easily share the contents from your blog with their friends and co-workers. In fact, there is no need to explain about importance of social share button. However saying, a social share button can grow up visitor for your blog. Social share button help to holding visitor in your blog.


How To Add This Feature To Blogger?

I think your are already familiar with blogger dashboard so, i think it's not necessary to provide ScreenShots to reach to your blogger Dashboard. Therefore, i will guide you with the help of text.

1. Sign in to your blogger
2. Select your blog (In case if you have more than one blog)

3. Click on Template  >Edit HTML  > and click anywhere inside the template and press C + F to locate the </style> and paste the below CSS code right before the </style> tag.


/* Share Button */ .post-footer{margin-top:30px;} .share-post, .multiauthor-box {margin-bottom:50px;} .share-post ul {padding:0;margin:0;text-align:center;} .share-post li{list-style:none;display:inline-block;margin-right:10px;padding:0;font-weight:700;text-transform:uppercase} .share-post li:first-child {font-size:16px;color:#22a1c4;} .share-post li a{display:block;text-align:center;} .share-post span{display:none;} .share-post li a i{display:block;color:#fff;width:40px;height:40px;line-height:40px;font-size:18px;border-radius:40px;font-weight:normal;transition:all .3s;} .share-post{margin-bottom:30px;border-top:1px solid #eff0f0;border-bottom:1px solid #eff0f0;line-height:52px;min-height:52px;margin-left:-30px;margin-right:-30px} .share-post li a i.fa.fa-facebook{background:#3b5998;border:1px solid transparent;} .share-post li a i.fa.fa-twitter{background:#19bfe5;border:1px solid transparent;} .share-post li a i.fa.fa-google-plus{background:#d64136;border:1px solid transparent;} .share-post li a i.fa.fa-linkedin{background:#006699;border:1px solid transparent;} .share-post li a i.fa.fa-pinterest{background:#cb2027;border:1px solid transparent;} .share-post li a i.fa.fa-facebook:hover{background:#fff;color:#3b5998;border:1px solid #4666aa;} .share-post li a i.fa.fa-twitter:hover{background:#fff;color:#19bfe5;border:1px solid #2acef4;} .share-post li a i.fa.fa-google-plus:hover{background:#fff;color:#d64136;border:1px solid #e95247;} .share-post li a i.fa.fa-linkedin:hover{background:#fff;color:#006699;border:1px solid #017ab6;} .share-post li a i.fa.fa-pinterest:hover{background:#fff;color:#cb2027;border:1px solid #e33239;}

Now Put the below code where you want to show your share buttons. Basically you should put the share buttons are after <data:post.body/> sections.

<div class='share-post'>
<ul class='entry-share-list clearfix'>
 <li>Share This</li>
 <li class='facebook_share'>
 <a expr:href='&quot;http://www.facebook.com/sharer.php?u=&quot; + data:post.url + &quot;&amp;title=&quot;+ data:post.title' onclick='window.open(this.href, &apos;windowName&apos;, &apos;width=550, height=600, left=24, top=24, scrollbars, resizable&apos;); return false;' rel='nofollow' target='_blank'>
<i class='fa fa-facebook'/> </a> </li>
<li class='twitter_share'>
<a expr:href='&quot;http://twitter.com/share?url=&quot; + data:post.url + &quot;&amp;title=&quot; + data:post.title' onclick='window.open(this.href, &apos;windowName&apos;, &apos;width=550, height=600, left=24, top=24, scrollbars, resizable&apos;); return false;' rel='nofollow' target='_blank'>
<i class='fa fa-twitter'/></a> </li>
 <li class='google_share'>
<a expr:href='&quot;https://plus.google.com/share?url=&quot; + data:post.url + &quot;&amp;title=&quot; + data:post.title' onclick='window.open(this.href, &apos;windowName&apos;, &apos;width=550, height=600, left=24, top=24, scrollbars, resizable&apos;); return false;' rel='nofollow' target='_blank'><i class='fa fa-google-plus'/></a> </li>
<li class='linkedin_share'>
 <a expr:href='&quot;http://www.linkedin.com/shareArticle?mini=true&amp;url=&quot; + data:post.url + &quot;&amp;title=&quot;+ data:post.title' onclick='window.open(this.href, &apos;windowName&apos;, &apos;width=550, height=600, left=24, top=24, scrollbars, resizable&apos;); return false;' rel='nofollow' target='_blank'>
<i class='fa fa-linkedin'/></a> </li>
<li><a expr:href='&quot;http://pinterest.com/pin/create/button/?url=&quot; + data:post.url + &quot;&amp;media=&quot; + data:post.thumbnailUrl + &quot;&amp;description=&quot; + data:post.snippet' onclick='window.open(this.href, &apos;windowName&apos;, &apos;width=550, height=600, left=24, top=24, scrollbars, resizable&apos;); return false;' rel='nofollow'>
<i class='fa fa-pinterest'/></a>
</li>
</ul>
</div>


Now save the template and see the result.

Note that, Font-awesome must be added in your template. Otherwise social icons are may not shown. If not added then copy the below script and past before </head> tag.

<script type='text/javascript'>
//<![CDATA[
//CSS Ready function loadCSS(e, t, n)
{
 "use strict"; var i = window.document.createElement
("link"); var o = t || window.document.getElementsByTagName("script")
[0]; i.rel = "stylesheet"; i.href = e; i.media = "only x";
o.parentNode.insertBefore(i, o); setTimeout(function () { i.media = n || "all" }) } loadCSS("http://fonts.googleapis.com/css?family=Open+Sans:400italic,400,600,700,300");loadCSS
("https://maxcdn.bootstrapcdn.com/font-awesome/4.3.0/css/font-awesome.min.css");
//]]>
</script>

Now save the template and you are done.
Awesome Pop up Email Subscription box for Blogger

Awesome Pop up Email Subscription box for Blogger

Pop up Email Subscription box for Blogger
A subscription form lets your subscribed readers to conveniently read your latest blog posts and they are very popular in electronic communications. Newsletters are published by Bloggers, clubs, churches, societies, associations, and businesses—especially companies to provide information of interest to members, customers, or employees. 
Blogger Pop up Email Subscribe box is a blogger widget using jquery. This subscription form created with css3 and jquery. In this tutorial i shared how to add pop up email subscription box for your blogspot blog.
By adding this widget, you should easily increase your blog readers. It's a better way for increase blog readers. I hope this fresh pop up email subscribe box help you to increase blog readers. Now lets start the tutorial.

Follow the tutorial:

Go to blogger dashboard >Template >Edit HTML >and past the below Code before </style>


#sub-box {display:none;background:rgba(0,0,0,0.9);width:100%;height:100%;position:fixed;top:0;left:0;z-index:99999;} #boxclose {width:100%;height:100%;-webkit-transform:translateZ(0);} #boxview {background:#fff;border:8px solid #fff;width:600px;height:250px;position:absolute;top:33%;left:28%;} #closebox {float:right;cursor:pointer;position:absolute;right:-1px;top:-2px;} #closebox:before {content:&quot;Close&quot;;padding:5px 8px;background:#fff;color:#48cb7a;font-weight:normal;font-size:12px;font-family:Open sans;} #boxlink,#boxlink a.visited,#boxlink a,#boxlink a:hover {color:#aaaaaa;font-size:9px;text-decoration:none;text-align:center;padding:5px;} #subscribe-box {width:600px;height:250px;background-color:#02BA74;} #subscribe-box p {font-family:&#39;Open Sans&#39;;font-size:18px;color:#fff;line-height:20px;padding:10px 20px 0 20px;margin:0;} #subscribe-box .emailfield {padding:0px 20px 10px;} #subscribe-box .emailfield input {background:#f9f9f9;color:#bbb;padding:10px;margin-top:10px;font-size:13px;font-family:&#39;Open Sans&#39;;width:96.3%;border:0;transition:all 0.4s ease-in-out;} #subscribe-box .emailfield input:focus {background:#fff;outline:none;color:#888;} #subscribe-box .emailfield .submitbutton {background:#444;color:#fff;text-transform:uppercase;font-weight:normal;font-size: 16px;border:none;outline:none;width:100%;cursor:pointer;border-radius:3px;transition:all 0.4s ease-in-out;} #subscribe-box .emailfield .submitbutton:active {outline:none;border:none;background:#fff;color:#e25734;} #subscribe-box .emailfield .submitbutton:hover{background:#fff;color:#444;}

Now hit Save Template
Now go to  >Layout  >Add a gadget >HTML/Javascript > and finally past the following below code.


<script type='text/javascript'>
 //<![CDATA[
 jQuery.cookie = function (key, value, options) {
 // Pengaturan cookie
 if (arguments.length > 1 && String(value) !== "[object Object]") {
options = jQuery.extend({}, options);
if (value === null || value === undefined)
{ options.expires = -1;
}
if (typeof options.expires === 'number')
{ var days = options.expires, t = options.expires = new Date(); t.setDate(t.getDate() + days); }
value = String(value); return (document.cookie = [ encodeURIComponent(key), '=',
options.raw ? value : encodeURIComponent(value),
options.expires ? ';
expires=' + options.expires.toUTCString() : '',
// use expires attribute, max-age is not supported by IE options.path ? ';
path=' + options.path : '',
options.domain ? '; domain=' + options.domain : '',
options.secure ? '; secure' : '' ].join(''));
}
// cookie options = value || {};
var result, decode = options.raw ? function (s) { return s; } :
decodeURIComponent; return (result = new RegExp('(?:^|; )' +
encodeURIComponent(key) + '=([^;]*)').exec(document.cookie)) ?
decode(result[1]) : null; };
 //]]>
 </script>
 <script type='text/javascript'>
 jQuery(document).ready(function($){ if($.cookie('popup_facebook_box')
!= 'yes')
{ $('#sub-box').delay(3000).fadeIn('fast');
$('#closebox, #boxclose').click(function(){ $('#sub-box').stop().fadeOut('fast'); }); } }); </script>

<div id='sub-box'>
<div id='boxclose'>
</div> <div id='boxview'>
 <div id='closebox'> </div>
 <div id='subscribe-box'>
 <center><p>Subscribe for Latest Update</p></center>
 <div class='emailfield'>

 <form action='http://feedburner.google.com/fb/a/mailverify?uri=YOUR-USER-NAME' method='post' onsubmit='window.open(&apos;http://feedburner.google.com/fb/a/mailverify?uri=YOUR-USER-NAME, &apos;popupwindow&apos;, &apos;scrollbars=yes,width=550,height=520&apos;);return true' target='popupwindow'> <input type='text' name='name' onblur='if (this.value == &quot;&quot;) {this.value = &quot;Your Name&quot;;}' onfocus='if (this.value == &quot;Your Name&quot;) {this.value = &quot;&quot;;}' value='Your Name'/>
 <input type='text' name='email' onblur='if (this.value == &quot;&quot;)
{this.value = &quot;Your Email&quot;;}' onfocus='if (this.value == &quot;Your Email&quot;) {this.value = &quot;&quot;;}' value='Your Email'/>
<input name='uri' type='hidden' value='YOUR-USER-NAME'/>
<input name='loc' type='hidden' value='en_US'/> <input class='submitbutton' type='submit' value='Subscribe Now!'/> </form>
 </div>
</div> </div>
</div>


Note: Now Replace YOUR-USER-NAME  with your feedburner user name.

Now you are  done!
Blogger Author Widget with CSS3 Creative Design

Blogger Author Widget with CSS3 Creative Design

 Blogger Author Widget with CSS3

What Is An Author Bio Box?

An Author Bio Box is clearly defined as the originator of any written article, and can thus also be described as a writer (with any distinction primarily being an implication that an author is a writer of one or more major works, such as blog posts or a tutorial). In general, an Author is a person who writes a novel, poem, essay, articles, news papers etc. The composer of a literary work, as distinguished from a compiler, translator, editor, or copyist.

If you are looking for a fully responsive author bio box for your blog, Simple Author Box could be the one for you. This lightweight piece of code will add an attractive author box at the end of your every blog posts. The author box displays the author name, description and links to various social media accounts.

Including an author box in your blog posts makes sure that your visitors can find more information about the author in the same page. Contrary to popular belief, adding author box after post is very simple. If you wish to give your blog a professional look, then here i will show you excellent trick which let you add author Bio box within no time.

You can also choose to display links to all posts by the author and link the author name and avatar. It is also possible to apply custom CSS styles to make the widget look more attractive according to your need.

Blogger Author Widget with CSS3 - in this tutorial i shared a author widget for
blogger. Yeah! its a great tutorial for all bloggers admin. Specially this tutorial my
helpful for who run personal blog. A beautiful widget is only for you. Flat, Clean and
responsive.
You should add 4 social icons with your links. Twitter, Facebook, Dribble and Google
Plus icons. This widget will work with CSS3 transition hover effect. When you mouse
hover on this widget, then it open other part. Its social icons part. If you wanna see a
demo, look at our widget.

Step 1. Now lets start. Go to Blogger Dashboard  > Template  > Edit HTML  > and past below
CSS before </style>

@import url(http://weloveiconfonts.com/api/?family=entypo); [class*=&quot;entypo-&quot;]:before {font-family: &#39;entypo&#39;, sans-serif;} *{ box-sizing: border-box; } a { text-decoration: none; transition: all .4s; } .container { margin: 0 auto; } .container:hover .author-body { height: 70px; } .author-body a {color:#fff} .author2 { overflow: auto; padding: 20px; background: #fff; border-radius: 5px 5px 0 0; font-size:12px; color: #b9becd; } .author2:before { content: &quot;&quot;; display: block; float: left; width: 80px; height: 80px; margin-right: 20px; background: url(&quot;http://i.imgur.com/rppvYgh.jpg&quot;) no-repeat; background-size: 80px; border-radius: 100%; } .author2 h1 { margin: 15px 0 5px; font-weight: 100; font-size:20px; color: #5e6d81; } .author-body { height: 0; background: #323a45; color: #fff; vertical-align: middle; transition: all .3s; } .author-body a { display: inline-block; width: 25%; height: 100%; padding: 20px; border-right: 1px solid rgba(255,255,255,.25); text-align: center; color: #fff; font-size: 2.5em} .author-body a:hover { background: #515761; } .author-body a:last-child { border-right: none; } .foot { /*height: 100px;*/ } [class^=&quot;footItem&quot;] { display: inline-block; width: 33.333333%; padding: 15px 0; text-align: center; color: rgba(255,255,255,.8); font-size: 1.1em; } [class^=&quot;footItem&quot;] span { display: block; font-size: 1.6em; margin-bottom: 5px; color: #fff; } .footItem1 { background: #14b9d6; color: white!important;} .footItem1:hover { background: #5bcee2; } .footItem2 { background: #f27935; color: white!important; } .footItem2:hover { background: #f6a172; } .footItem3 { background: #1fbba6; color: white!important;} .footItem3:hover { background: #63d0c1; } .widget-content { box-shadow: 0 0 0 1px #D3D3D3;} .section:first-child .widget:first-child {margin-bottom:15px}

Note: Change the highlighted image link with you image URL that you want to display And finally hit Save template.

Step 2.
Now go to your blogger Layout  >Add a Gadget  >HTML/JavaScript and paste the following piece of code:


<div class="container">
 <div class="author2">
                      <h1>Farooq Bhat</h1> The Author </div>
 <div class="author-body">
 <a href="Twitter-URL"><span class="entypo-twitter"></span></a>
<a href="Facebook-URL"><span class="entypo-facebook"></span></a>
<a href="Dribble-URL"><span class="entypo-dribbble"></span></a>
<a href="Google + RRL"><span class="entypo-gplus"></span></a>
 </div>
 <div class="foot">
 <a href="#" class="footItem1">
<span class="entypo-heart"></span>102</a>
<a href="#" class="footItem2">
<span class="entypo-user"></span>4,587</a><a href="#" class="footItem3">
<span class="entypo-plus"></span>84,023</a> </div>
</div>

Change the bold words with your URLs.
Add Flat Popup Facebook Like Box Widget for Blogger

Add Flat Popup Facebook Like Box Widget for Blogger

Add Flat Popup Facebook Like Box Widget for Blogger
Targeted visitors are most important of any blog. Retention blog visitors more and more important. If you want to increase your facebook like then should promote your page in your blog with your blog's users. Then you will get more like from your users who visit your blog. Adding the pop up like box is most essential for get more like. So today i am gonna to share a tutorial about pop up facebook like box for blogger.
This widget was made with some cookies and these are unnecessary. Recently i build another  popup facebook like box widget using CSS and JavaScript No cookies included.

How Does it Work?

Recently i found a popup jQuery and I used this jQuery in this popup facebook like box widget eZmodal is a simple and fast jQuery plugin which enables you to display static html content in a responsive, fully configurable modal popup window. This a best popup plugin. Thats why i used eZmodal in this widget.
Using facebook like box you may keep your visitors in your touch. This way is another great way for increase blog traffic. Popup facebook like box is great way for promote your fan page with your blog visitors. Proper use of like box, you can get more like for your fan page.

Facebook is a great way for increase blog traffic. When you share your content on your facebook page, then here is an opportunity to share your content by your visitor with others. In this way can get more extra traffic. In this circumstance, you have must need promote your page with your blog. Popup like box is one of the best way.

Step 1: Go to  >Blogger Dashboard  >Template  > Edit HTML and past below code before </style>
/*=============== CSS Popup Like box ======================*/ .mspopup{position:fixed;top:0;left:0;right:0;bottom:0;z-index:90000;background:rgba(0,0,0,.6);overflow-x:hidden;overflow-y:auto;display:none} .mspopup-container{background:#fff url(http://i.imgur.com/2twQjiN.gif) no-repeat 50% 50%;padding:0;font-size:14px;height:236px;position:fixed;top:50%;left:50%;z-index:90001;-webkit-box-shadow:0 0 15px 0 rgba(50,50,50,0.8);transform:translateY(-50%) translateX(-50%)} .mspopup .mspopup-close{position:absolute;top:9px;right:20px;font-weight:700;font-family:Verdana;font-size:18px;cursor:pointer;color:#fff} .mspopup .mspopup-close:hover{color:#535353} .mspopup .mspopup-header{font-size:20px;padding:10px;text-align:center;color:#fff;font-family:Open Sans;background-color:#3B5998;text-shadow:1px 2px 4px #838383} .mspopup .mspopup-header p{font-size:10px;padding:0;margin:0;font-weight:400;text-transform:initial} .mspopup .mspopup-content{padding:10px 20px}

Step2: Now past below code before </body> tag.
<script src='https://cdn.rawgit.com/knigulper/github.io/gh-pages/knigulper.blogspot.com/fbpopuplikebox.js' type='text/javascript'/> <script type='text/javascript'> $(&#39;#popup-box&#39;).mspopup({ &#39;autoOpen&#39;: true }); </script>

Step3: Go to  >Layout  >Add a gadget  >HTML/Javascript and past below code.
<div id="popup-box" class="mspopup"> <div class="mspopup-container"> <div class="mspopup-header"> <div class="mspopup-close" data-dismiss="mspopup">x</div> Like us and Join with our community <p> Get our all latest update from our facebook page, Its free and speedy</p> </div> <div class="mspopup-content"> <div class="fb-page" data-href="https://www.facebook.com/knigulper" data-width="400" data-height="300" data-small-header="true" data-adapt-container-width="true" data-hide-cover="true" data-show-facepile="true" data-show-posts="false"><div class="fb-xfbml-parse-ignore"></div></div> </div> </div> </div>

Note:  Change knigulper with your facebook page username.
Popular Posts widget with Thumbnail and Auto Numbering for Blogger

Popular Posts widget with Thumbnail and Auto Numbering for Blogger

Popular Posts widget with Thumbnail and Auto Numbering
In this tutorial i will share how add a popular posts widget in your blog with Thumbnail and auto numbering. Blogger popular posts widget is a customize able widget with CSS.
This widget created with CSS element. when visitors mouse hover on this widget's every posts, then snippet will shown. Normally in this widget snippet has hidden.
Blogger popular posts widget is a most important part of blogger. This widget help your visitors to find most viewed or most discussed posts. By using this widget you could grow up your visitors. Every users of blogspot looking for a great design of their blog. Blogger popular posts widget is widget, that show most viewed post (last 7days, last 30days and all time viewed). Some times you have need more attractive and some unique widget for your blog. Because popular posts widget is a most important in every blog. By using popular posts widget, you could increase your blog traffic. Every users always looking for most interesting posts, that users make helped.
Blogger popular posts widget is way to show most interesting and most viewed posts in your blog.
Today i am sharing a popular posts widget for blogger that show popular posts of your blog thumbnail with auto numbering. In short, auto numbering is popular posts with every position. Using this custom popular posts widget, you can make your popular posts widget more unique that is important in your blog.

Now lets start, at first you have to need configure your popular posts widget. Go to >Layout >Add a gadget >Popular posts and configure it.

Now go to >Template >Edit HTML > and copy below CSS code and paste it just above the </style>

/* CSS Popular Post */ .PopularPosts ul,.PopularPosts li,.PopularPosts li img,.PopularPosts li a,.PopularPosts li a img{list-style:none;border:none;background:none;outline:none;margin:0;padding:0} .PopularPosts ul{list-style:none;font-family:&#39;Oswald&#39;,Sans-Serif;font-size:13px;color:#919392;margin:.5em 0} .PopularPosts ul li img{display:block;width:70px;height:70px;float:left;margin:0 15px 0 0; border: 1px solid silver;padding: 2px;} .PopularPosts ul li{background-color:#eee;counter-increment:num;position:relative;margin:0 10% 0 0;padding:10px} .PopularPosts ul li:before,.PopularPosts ul li .item-title a{font-weight:700;font-size:13px;color:#919392;text-decoration:none;transition:.5s linear; font-family: Open Sans;} .PopularPosts ul li:before{content:counter(num);display:block;position:absolute;background-color:rgb(247, 73, 73);color:#fff;width:30px;height:28px;line-height:25px;text-align:center;bottom:0;right:0;margin-top:15px;transition:.5s linear; border-radius: 10%;font-size: 18px; padding: 5px;} .PopularPosts ul li:nth-child(1),.PopularPosts ul li:nth-child(2),.PopularPosts ul li:nth-child(3),.PopularPosts ul li:nth-child(4),.PopularPosts ul li:nth-child(5),.PopularPosts ul li:nth-child(6),.PopularPosts ul li:nth-child(7),.PopularPosts ul li:nth-child(8),.PopularPosts ul li:nth-child(9),.PopularPosts ul li:nth-child(10){background:#fff;color:#aaacab; border-bottom:1px solid #EFEFEF;transition:all .5s linear;} PopularPosts ul li:last-child{border-bottom:none;} .PopularPosts ul li:hover:nth-child(1),.PopularPosts ul li:hover:nth-child(2),.PopularPosts ul li:hover:nth-child(3),.PopularPosts ul li:hover:nth-child(4),.PopularPosts ul li:hover:nth-child(5),.PopularPosts ul li:hover:nth-child(6),.PopularPosts ul li:hover:nth-child(7),.PopularPosts ul li:hover:nth-child(8),.PopularPosts ul li:hover:nth-child(9),.PopularPosts ul li:hover:nth-child(10){background-color:#fafafa;transition:all .5s linear;} .PopularPosts ul li:hover .item-title a{color:#37B576;transition:all .5s linear;} .PopularPosts ul li:hover:before{background-color:#37B576;color:#fff;transition:all .5s linear;} .PopularPosts .item-thumbnail{float:left;margin:0 0 0 10px;} .PopularPosts ul li .item-snippet {display:none;visibility:hidden;opacity:0;font-size:11px;color:#383838;transition:all .5s linear; font-family: Open Sans;} .PopularPosts ul li:hover .item-snippet {display:block;visibility:visible;opacity:1;transition:all .5s linear;}

And save your template
Add Arrow Key Navigation In Blogger

Add Arrow Key Navigation In Blogger

Arrow Key Navigation for Blogger
Navigating through a website using the keyboard arrow keys is really useful as you don't have to look around the page for the Newer or Older page links. You might have already seen this feature on many top blogs.It’s really easy to implement this feature on your Blogger Blog.You just have to add the arrow key navigation widget to your blogger blog.
This is a really simple and clean widget and you can see a demo of this widget right on this page. If you use theRight and Left arrow keys, you will be able to navigate to different pages on this blog. This works not just on the post pages, but also on the blog’s home page and label pages.The Arrow Key Navigation Widget will be disabled when you are typing something into a text box on the blog(This was done to avoid the page from being changed when the user is typing something into a text box and uses the arrow keys to move around this text.).

Why should I add this widget

This is a simple light weight widget which doesn’t depend on any external libraries and it’s really easy to install as well. It will give users a better experience when they are navigating across different pages of your blog.They won't have to scroll all the way down to the bottom of the page and look for the Older and Newer page links.

How to add this Widget

You can add this widget by using the below one click installer.
Add the widget to your sidebar or footer and the Arrow Key Navigation will be activated on your Blog.The Widget title won’t appear on your Blog. So you can give it any appropriate name which will help you in identifying the widget on the layout page.

How to let readers know of this Widget

You might want to add some text to your blog which suggests that your Blog can be traversed using the keyboard arrow keys.Something message similar to “Use the Left or Right Arrow keys to navigate through this blog” might help.

How to Remove the Widget

If you want to remove this widget at any time, you can do that by removing the Arrow Page Navigation Widget from the Layout page.

How this works


If you are curious about how this works, then below is the actual code behind the widget. The code listens for Keyboard inputs and if detects an Arrow Key event, it will redirect the user to the newer or older page. The code picks the newer and older page links from the Blogger’s Page Navigation Links.

<script type='text/javascript'> document.onkeyup = function(event) { if (document.activeElement.nodeName == 'TEXTAREA' || document.activeElement.nodeName == 'INPUT') return; event = event || window.event; switch(event.keyCode) { case 37: var newerLink = document.getElementById('Blog1_blog-pager-newer-link'); if(newerLink !=null) window.location.href = newerLink.href; break; case 39: var olderLink = document.getElementById('Blog1_blog-pager-older-link'); if(olderLink!=null) window.location.href = olderLink.href; } }; </script>